A Shopify store will help you start your online business easily and conveniently. Shopify is a simple-to-use platform that has all the tools you need to build an e-commerce store.
So, do you know how to set up a Shopify store? This guide will equip you with all the knowledge you need to know. Let’s dive into it and make your online store!
Source: Shopify
Under the same section, edit Unit System , Default Weight Unit , and Time Zone .
Step 3: Choose a Theme After completing the basic settings, you may look after your store’s visuals. Shopify has many different themes, including free and paid ones. You can choose the one that is suitable for your brand’s style.
You should go to the Online Store and choose Themes . Then, click Add Theme and click Visit Theme Store . Here, you can browse many themes categorized by price, industry, features, or catalog size.
Source: Shopify
After choosing a theme, click Customize to adjust colors, fonts, and layouts. Even free themes like Spotlight or Craft offer considerable flexibility, enabling you to reflect your brand’s identity.
When customizing your theme, you should ensure the design is clean, easy to navigate, and mobile-friendly. All these things affect user experience.
Step 4: Add Products & Collections Now, come to add your products. In your Shopify dashboard, choose Products , and then choose Add Product . Then, input product information.helps your store’s SEO rankings .
Source: Shopify
Shopify store allows you to manage the inventory of each product. Under the same section, you can input your stock levels and assign a unique SKU for each product variation (size, color, etc.).
You can also group your products into collections such as “Best Sellers” or “New Arrivals” to make it easier for customers to navigate and find what they’re looking for. To organize this, go to Products > Collections .
Fill in the collection title and description, and then add a collection image. Next, choose to create either a Manual Collection (where you add products individually) or an Automated Collection (where products are added based on specific conditions like tags or prices).
Source: Shopify
Step 5: Create Necessary Pages Every online store needs more than just product listings. Creating additional pages for key information helps build trust and offer a better user experience. Usually, you will need some pages as follows:
About Us Page: Tell your brand’s story and mission. This helps customers know more about your business.Contact Page: You should add a contact form so that customers can contact you when having any questions.FAQs Page: Address common questions regarding shipping, returns, or product care.Privacy Policy & Terms of Service: Shopify provides templates for legal policies under Settings > Legal . You can edit such templates to be suitable for your store’s policies. In your dashboard, go to Online Store and choose Pages . Then, click Add Page to create a new page. You should fill in the page’s title and content.
Source: Shopify
Step 6: Configure Navigation Menu Shopify store’s navigation helps customers go to the right pages. A nice menu can improve user experience, boosting conversion rates.
In your dashboard, you should go to the Online Store and choose Navigation . Customize both your main navigation – Main Menu and Footer Menu.
Include links to collections, individual product categories, and important pages like the Contact and About Us sections.
Source: Shopify
If your store has multiple product categories, consider adding a mega menu for easier navigation. Some apps like Qikify Mega Menu and Navigation or Buddha Mega Menu & Navigation can help you create a more organized menu structure.
Step 7: Set up Payment Methods You will need to establish your store’s payment gateway so that it can accept payments. Shopify supports many payment methods. They include Shopify Payments, PayPal, and others.
Source: Shopify
Shopify Payments: In your dashboard, navigate to Settings and choose Payments . Then, click on Activate Shopify Payments . This will enable you to accept credit card payments without additional transaction fees.PayPal Integration : Shopify automatically creates a PayPal Express Checkout account using the email you used to sign up. Under the Payments section, you can complete your PayPal account setup or switch to another PayPal account if needed.Alternative Payment Methods: Shopify also supports other payment methods, giving your customers more options at checkout. In the same section, you can click Add payment method , then choose the one you want and install it. Step 8: Configure Shipping Shipping is an essential aspect of ecommerce that needs to be configured properly to ensure seamless order fulfillment. To establish this, you should go to Settings > Shipping and Delivery .
Source: Shopify
In this section, you can click on General shipping rates and add shipping zones based on geographic regions. It also allows you to set up shipping rates – flat rates or real-time carrier shipping.
Real-time shipping requires you to integrate with carriers like USPS or DHL for dynamic rates based on customer location and package weight.
If your business offers local delivery or pickup, configure these options in the same section. Click Set up beside Local delivery > check the box next to “This location offers local delivery ” and set up your delivery.
Source: Shopify
You can see the default package in the Saved Packages section. It enables you to edit the information, including name, type, dimensions, and weight. Otherwise, you can click Add package and fill in the related information.
Dimensions and weight of your typical packaging will be used to calculate shipping rates.
Step 9: Install Necessary App Shopify’s App Store provides many apps that help you enhance the functionality of your store. When starting, you should pay attention to a few ones as follows:
Source: Klaviyo
Customer Support: Tidio Live Chat and HelpCenter are some suggestions. They enable you to provide customers with real-time support and FAQs. Source: Tidio
Analytics and Reports: Analytics apps support you with tracking visitor behavior, sales, and conversion rates. The first options are Google Analytics and Shopify Analytics. Source: Google Analytics
Discounts and Promotions: Although Shopify has an internal discount tool that allows merchants to create basic promotions like Free Gift with Purchase and Buy One Get One, many Shopify merchants choose to use third-party discount extensions for their ability to create advanced promotions such as Product Bundles and Quantity Discounts .Inventory Management: If your store handles large inventories, consider apps like Stock Sync or Prediko. They will help you simplify inventory tracking. Source: Stock Sync
Step 10: Connect Domain & Launch Your Store When everything is established, you should come to connect a domain and launch your store.
If you don’t have a domain yet, you can buy one directly through Shopify. In your dashboard, go to Settings , choose Domains , and click on Buy new domain . You can also buy from a third-party provider like GoDaddy. If you already have a domain, choose Connect existing domain and follow the steps thereafter.
Source: Shopify
Before launching, you should double-check all settings. This will help you ensure everything works properly.
Step 11: Test the Live Store Before officially announcing your store’s launch, take some time to test it. Ensure everything is running smoothly from the customer’s perspective.
Place a Test Order: Shopify allows you to place test orders to simulate the checkout process. This helps you verify that payments, shipping, and email confirmations are functioning correctly.Check Mobile Responsiveness: Since many customers shop via mobile devices, make sure your store looks and performs well on smartphones and tablets.Review Navigation and Links: Ensure that all internal links, menus, and buttons work properly, providing a seamless shopping experience. Conclusion Setting up a Shopify store is a straightforward process that allows anyone to launch an online business quickly and efficiently. By following the steps outlined in this guide, you know how to set up a Shopify store, from signing up to launching your live site.
Whether you’re new to ecommerce or an experienced entrepreneur, Shopify is user-friendly and flexible for getting started. You can try setting it up today!
FAQs What Is Shopify and How Can It Help Me Start an Online Business? It is a leading ecommerce platform that provides everything you need to build your online store. It allows you to create, manage, and grow your ecommerce business with ease. By using Shopify’s tools and features, you can start selling online quickly and efficiently.
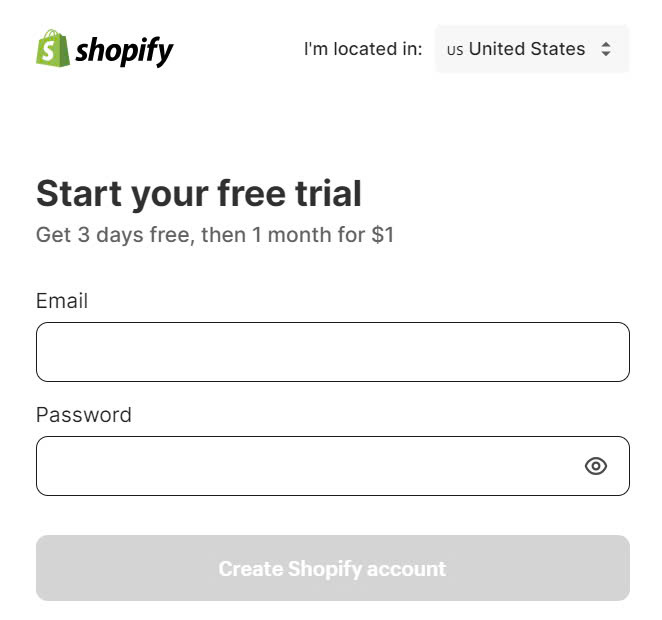
Is There a Way to Try Shopify Before Committing to a Plan? Yes, you can try Shopify for free for 3 days. This free trial allows you to explore the platform, set up your ecommerce store, and decide if it meets your business needs before selecting a Shopify plan.
What Are the Key Features of Shopify’s Ecommerce Platform? It offers a variety of features, including customizable templates, secure payment processing, mobile optimization, and advanced analytics. These tools help you manage your online store effectively and understand your sales performance.
How Do I Set Up a Checkout Process for My Online Store? To set up a checkout process on your online store, you can use Shopify’s admin panel to configure payment gateways, shipping options, and tax settings. This allows you to create the best checkout experience for your customers, enhancing their shopping journey.
Can I Sell Online and In-Person with Shopify? Absolutely! Shopify allows you to sell both online and in-person using Shopify POS (Point of Sale). This feature enables you to manage sales across multiple channels seamlessly, providing a cohesive shopping experience for your customers.
How Can I Track the Performance of My Ecommerce Store? You can use Shopify’s analytics tools to monitor your store’s performance. This includes tracking sales on Shopify, customer behavior, and overall store activity, enabling you to make informed decisions to grow your business.
What Types of Commerce Apps Can I Use with Shopify? Shopify offers a wide range of commerce apps that integrate with your store. These apps can help enhance functionality, improve customer experience, and streamline operations, ensuring you have everything you need to succeed in your online business.
How Can I Choose the Best Shopify Plan for My Business? When selecting a Shopify plan, consider your business size, sales volume, and specific features needed. Each plan offers different tools and pricing, so evaluate your requirements carefully to find the best fit for your ecommerce store.
What Are Some Successful Shopify Stores I Can Learn From? There are millions of merchants using Shopify, and many of them have built successful stores. Exploring top Shopify stores can provide inspiration and insights into effective strategies for your own online business.